需求分析
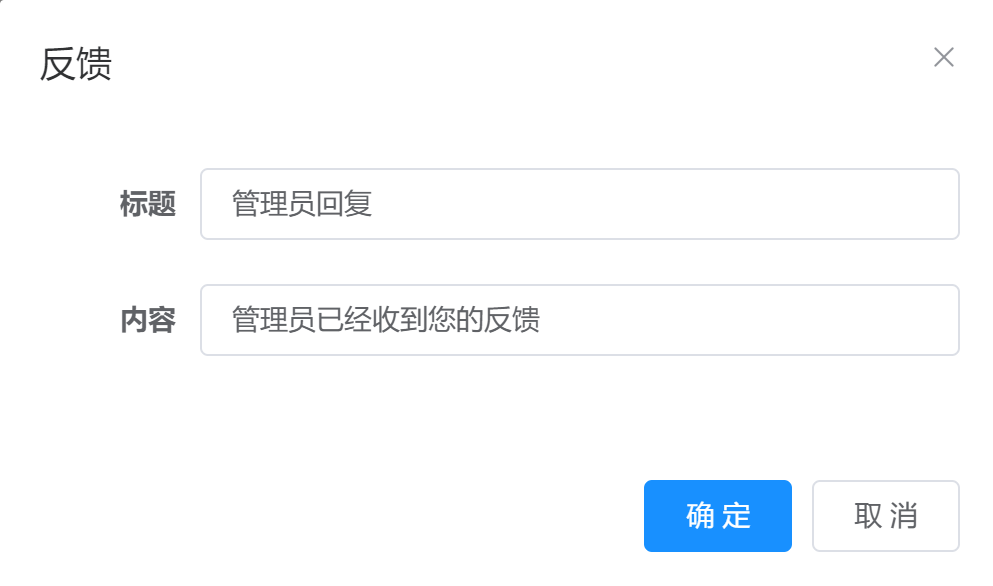
若依自带的消息功能非常鸡肋,不仅无法实现实时的消息推送,也无法提供准确的消息推送,即指定目标。其本质上是一个增删改查的功能,虽然可以通过管理员新增,然后后台数据库筛选的方式进行推送,但无疑这种方式不太优雅,在调研市面上已有的方案后,采用WebSocket+MQ(Message Queue,消息队列)的方式进行实时消息推送。其中WebSocket实现在线用户的实时通讯,MQ负责对于消息的发送者与接收者进行解耦。系统需要实现管理员在浏览指定数据后,可以点击反馈按钮,自定义一条消息发送给指定用户。
实验配置
若依框架 v3.8.7 :一种基于SpringBoot +Vue+...的后台管理系统框架
RabbitMQ 3.12.5 :一种消息队列
Erlang 25.3.2:一种实现RabbitMQ的语言
WebSocket
WebSocket是一种HTML5一种新的协议。它实现了浏览器与服务器全双工通信,能更好的节省服务器资源和带宽并达到实时通讯,它建立在 TCP 之上,同 HTTP 一样通过 TCP 来传输数据。WebSocket实现简单,使用起来支持双向通讯,使用前需要互相握手建立连接,类似TCP。在此之前,一般实时通讯都是使用“轮询”,即每隔一段时间自动判断是否在线,然后进行消息发送能功能。
具体应用而言,在若依框架下,WebSocket需要在前端Vue中添加方法进行连接建立。这样每次在刷新首页时,就能与后台建立连接。如果接收到了新的消息,onmessage函数就会利用ElementUI的Notification进行消息提示,这样就能达到实时推送的效果。
created(){
    this.join_websocket();
  },
  beforeDestroy() {
    // 组件销毁前关闭 WebSocket 连接
    if (this.socket) {
      this.socket.close();
    }
  },
  methods: {
    join_websocket(){
      const wsuri = this.url+this.$store.state.user.id;
      this.socket = new WebSocket(wsuri);

      this.socket.onopen = (event) => {
        // console.log('WebSocket 连接已打开');
      };

      this.socket.onmessage = (event) => {
        const message = event.data;
        this.showNotification('新消息', message);
        // console.log('收到新消息:'+message)
      };

      this.socket.onerror = (error) => {
        // console.error('WebSocket 发生错误:', error);
      };

      this.socket.onclose = (event) => {
        // console.log('WebSocket 连接已关闭');
      };
    },
    showNotification(title, message) {
      const h = this.$createElement;

        this.$notify({
          title: title,
          message: h('i', { style: 'color: teal'}, message)
        });
    },
  }
在后端,可以以若依官方自带的例子作为基础,在此基础上稍加修改,即可完成WebSocket的后台。切记,一定要按照教程添加依赖,如果有调试需求,可以添加匿名访问,这样可以在不登录的情况下测试WebSocket连接。这里直接使用了用户的ID作为连接的标志,主要是为了调试方便,以及获取用户详细信息比较方便,在正式的环境中可以调整为用户登陆的token,这样更加安全,但是如果要根据token来获得用户的详细信息,可能要通过Redis数据库来遍历一下(token存放在Redis中)。主要是WebSocketService需要修改,这里提供部分修改后的代码:
@Component
@ServerEndpoint("/websocket/message/{userId}")
public class WebSocketService {
    /**
     * WebSocketServer 日志控制器
     */
    private static final Logger LOGGER = LoggerFactory.getLogger(WebSocketService.class);

    /**
     * 默认最多允许同时在线人数100
     */
    public static int socketMaxOnlineCount = 100;

    private static Semaphore socketSemaphore = new Semaphore(socketMaxOnlineCount);

    public static Map<String, Session> USER_SESSIONS = new ConcurrentHashMap<>();

    public static String currentId="";
    /**
     * 连接建立成功调用的方法
     */
    @OnOpen
    public void onOpen(@PathParam("userId") String userId, Session session) throws Exception {
        //从登录链接获取用户信息,记录下来
        USER_SESSIONS.remove(userId);
        USER_SESSIONS.put(userId, session);
        currentId = userId;

        boolean semaphoreFlag = false;
        // 尝试获取信号量
        semaphoreFlag = SemaphoreUtils.tryAcquire(socketSemaphore);
        if (!semaphoreFlag) {
            // 未获取到信号量
            LOGGER.error("\n 当前在线人数超过限制数- {}", socketMaxOnlineCount);
            WebSocketUsers.sendMessageToUserByText(session, "当前在线人数超过限制数:" + socketMaxOnlineCount);
            session.close();
        } else {
            // 添加用户
            WebSocketUsers.put(session.getId(), session);
            LOGGER.info("\n 建立连接 - {}", session);
            LOGGER.info("\n 当前人数 - {}", WebSocketUsers.getUsers().size());
            WebSocketUsers.sendMessageToUserByText(session, "登录成功");
        }
    }
    // 消息发送函数
    public void sendToUser(String targetId,String name,String createName, String text) throws IOException {
        Session session = WebSocketService.USER_SESSIONS.get(targetId);
        if (session != null) {
            session.getBasicRemote().sendText(createName+" : "+text);
        }
    }
}若依官方的教程:教程
RabbitMQ
在选择消息队列时调研了一下各个主流MQ的优缺点,由于业务数据量不大,也没有高可靠性的需求,ActiveMQ有些庞大笨重,RocketMQ和kafka用不上,最后选择使用RabbitMQ。
| 特性 | ActiveMQ | RabbitMQ | RocketMQ | kafka |
|---|---|---|---|---|
| 开发语言 | java | erlang | java | scala |
| 机吞吐量 | 万级 | 万级 | 10万级 | 10万级 |
| 时效性 | ms级 | us级 | ms级 | ms级以内 |
| 可用性 | 高(主从架构) | 高(主从架构) | 非常高(分布式架构) | 非常高(分布式架构) |
| 功能特性 | 成熟的产品,在很多公司得到应用;有较多的文档;各种协议支持较好 | 基于erlang开发,所以并发能力很强,性能极其好,延时很低;管理界面较丰富 | MQ功能比较完备,扩展性佳 | 只支持主要的MQ功能,像一些消息查询,消息回溯等功能没有提供,毕竟是为大数据准备的,在大数据领域应用广。 |
来源:来源
安装
首先需要安装RabbitMQ的语言Erlang。我使用的是Erlang 25.3.2。下载安装完之后,在系统的环境变量中添加ERLANG_HOME,路径为Erlang的安装目录,举例:D:\erlang\Erlang OTP。然后在Path中添加%ERLANG_HOME%\bin,引入路径。如果成功安装,使用管理员进入小黑框后,输入erl -version会出现版本号。

官网安装地址:Erlang官网
在安装完语言后,就可以下载安装RabbitMQ了,我选择的是RabbitMQ 3.12.5。安装的时候一路next即可。安装完,在cmd中进入安装目录下的sbin文件夹,举例:D:\rabbitmq\rabbitmq_server-3.12.5\sbin。输入命令rabbitmq-plugins enable rabbitmq_management进行网络管理插件,如果没有错误,那么进入localhost:15672即可可视化管理消息队列,也说明安装正式完成。默认账号和密码都是guest。
官网安装地址:RabbitMQ官网

使用
回归正题,在安装完消息队列后,需要在后端编写业务函数。
配置类:
import org.springframework.amqp.rabbit.connection.ConnectionFactory;
import org.springframework.amqp.rabbit.core.RabbitAdmin;
import org.springframework.context.annotation.Bean;
import org.springframework.context.annotation.Configuration;

@Configuration
public class RabbitMQConfig {

    @Bean
    public RabbitAdmin rabbitAdmin(ConnectionFactory connectionFactory) {
        return new RabbitAdmin(connectionFactory);
    }

}
这里也是为了调试方便,因此使用user.queue.{userId}作为每个队列的名称。我们可以这样类比:队列就类似一个信箱,管理员给指定用户发送信息时会去检查用户是否有信箱,如果没有信箱,则为他创建一个,如果已经存在信箱,则直接往里面投信即可。因此每个用户都有一个属于自己的队列,由于业务数据量不大,这样的方式实现简单且易于理解,如果业务量增大,则可能需要调整整体的架构。
Service:
import org.springframework.amqp.core.Queue;
import org.springframework.amqp.rabbit.core.RabbitAdmin;
import org.springframework.beans.factory.annotation.Autowired;
import org.springframework.stereotype.Service;


import java.util.ArrayList;
import java.util.List;
import java.util.Properties;

@Service
public class RabbitMQService {

    @Autowired
    private RabbitAdmin rabbitAdmin;

    @Autowired
    private MessageSender messageSender;

    @Autowired
    private MessageReceiver messageReceiver;

    public boolean haveQueue(String queueName){
        // 检查队列是否存在
        Properties queueProperties = rabbitAdmin.getQueueProperties(queueName);
        if (queueProperties == null) {
            return false;
        }
        return true;
    }

    public void sendMessageToUserByMQ(String createBy,String createName,String receiverId, String name,String message) {
        // 构造队列名称
        String queueName = "user.queue." + receiverId;

        if (!haveQueue(queueName)) {
            // 队列不存在,声明队列
            Queue userQueue = new Queue(queueName);
            rabbitAdmin.declareQueue(userQueue);
            System.out.println("Queue " + queueName + " has been created.");
        } else {
            System.out.println("Queue " + queueName + " already exists.");
        }

        // 发送消息到用户队列,此时队列肯定存在
        messageSender.sendToUser(createBy,createName,receiverId,name, message);
    }

    public List<Notice> receiveMessagesFromUserQueue(String receiverId) {
        // 构造队列名称
        String queueName = "user.queue." + receiverId;
        if (!haveQueue(queueName)) {
            System.out.println("没有该队列:"+queueName);
            return new ArrayList<>();
        }
        else {
            return messageReceiver.receiveFromUser(queueName);
        }
    }
}为了进一步解耦,因此将Sender和Receiver分开编写,其中receiveAndConvert函数自动接收并确认消息,在具体业务中,在接收完消息后就会将这条数据加入数据库中。
import com.alibaba.fastjson2.JSONObject;
import org.springframework.amqp.core.Queue;
import org.springframework.amqp.rabbit.core.RabbitTemplate;
import org.springframework.beans.factory.annotation.Autowired;
import org.springframework.stereotype.Component;

import java.util.ArrayList;
import java.util.List;

@Component
public class MessageSender {

    @Autowired
    private RabbitTemplate rabbitTemplate;

    public void sendToUser(String createBy, String createName,String receiverId, String name, String content) {
        Notice notice = new Notice();
        /*
            这里编写具体的业务函数
        */
        // 重点:将对象转化为字符串,可以直接通过消息队列传输
        String noticeString = JSON.toJSONString(notice);

        // 发送消息到目标用户的队列
        rabbitTemplate.convertAndSend("user.queue." + receiverId, noticeString);
    }
}

@Component
public class MessageReceiver {
    @Autowired
    private RabbitTemplate rabbitTemplate;

    public List<Notice> receiveFromUser(String queueName) {

        List<Notice> notices = new ArrayList<>();
        Queue userQueue = new Queue(queueName);
        while (true) {
            String noticeString = (String) rabbitTemplate.receiveAndConvert(userQueue.getName());
            Notice notice =  JSONObject.parseObject(noticeString,Notice.class);
            if (notice == null) {
                // 队列中没有更多的消息,退出循环
                break;
            }
            notices.add(notice);
        }

        return notices;
    }
}
总体流程图大致如下:

效果图:

结语
这个实验到这也就暂时告一段落了,从接收需求、技术调研到最后的落地,前前后后也弄了一个多星期,能够实现这样一个模块也是挺有成就感的,同时,这个模块也能给团队的其他功能共用,也算是一个实用的功能。
